
I will discuss right here the ins and outs of building landscape retaining walls of a variety of components. In quite a few regions a developing permit is essential for retaining walls so check along with your regional creating department just before you start the performance. In my Township only walls over 48″ higher demand a permit but finest to verify in any case.
There are lots of, numerous varieties of retaining wall components accessible today. Fieldstone, railroad ties, pressure-treated ties, brick, inter-locking masonry block that resembles stone, brick, and so on. The distinct sorts require slightly distinctive strategies of installation but all have some identical basic ideas. You will need to start with fantastic strong soil underneath. Do not try to make on leading of topsoil, wet loam, or other soft and pliable ground material. Your wall will simply move using the earth and self-destruct as time passes.
If you are dealing with topsoil or soft ground, it will be necessary to excavate and remove this soil to a foot or two beneath ground level, placement of a superb sub-base gravel or item material, compaction after which make your wall on major of that. A very good sub-base will give you years of superior-looking retaining walls with really small upkeep operations. In my area, a wall-less than 4′ high is viewed as a landscaping item. More than 4′ in height, the creating department wants a permit and drawings. Verify with them ahead of you construct your wall. several levels of retaining walls can develop excellent garden spaces. Seating places and flower gardens are usually developed in this way as well.
TOOLS Needed:
Wheelbarrow, sled hammer, tape measure, pencils, string line, level, 60 penny spikes, 3 /4″ electric drill, wood bits, extension cords, 7 1/4″ electric saw, low-priced carbide blades, pointed and square shovels. You may also have to have added loose appropriate material to backfill your wall as you go. 3/4″ gravel functions the ideal. Quite a few 2′ pieces of either #4 or #5 rebar reduce 24″ extended. Pin bars, picks, electric demo hammers all is often terrific assets in making the job a lot easier.
WOOD TIE WALLS
Whether or not you use 6 x 6 stress treated ties, railroad ties, or other dimensional lumber, they all start with a minimum of one tie below the completed grade. Putting 1 tie under grade will help anchor the bottom of the wall and maintain it from sliding out when the backfill material is placed behind it. The first or base tie would be the most crucial. It must be level, align nicely with the other people for the length of your wall, and be secured firmly. As soon as you’ve set the bottom or base tie in spot., utilizing your 3/4″ drill with a suitable sized wood bit for the rebar you have, drill a hole at the least every 4 feet along the length of your ties starting at a single end and often ending with a hole at each ends. Applying your sledgehammer, drive a piece from the 2′ rebar down into the earth till its level using the leading from the tie.
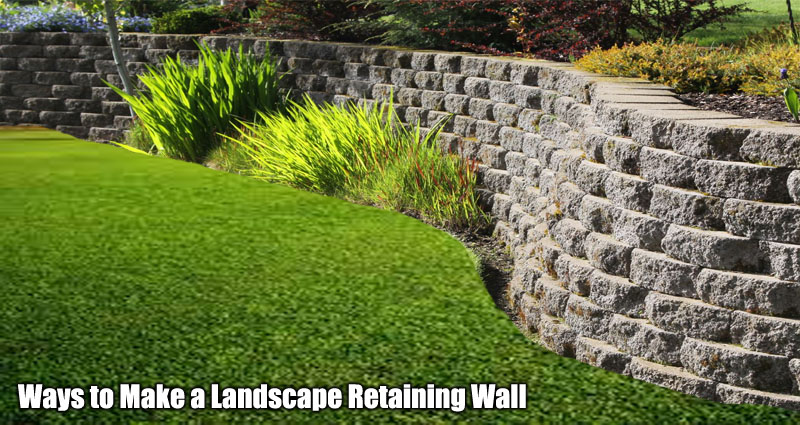
PRE-CAST MASONRY RETAINING WALLS
Extra tools expected:
In addition to the tool list provided above, you’ll need to have a gas-powered 12″ cutoff saw with masonry blades. Blades wear out promptly so get various of them. A chipping chisel, a brick set, and a 5-pound lump hammer are also required.
There are various pre-cast concrete masonry units in the marketplace today that happen to be made for building retaining walls. Visit different retailers to find out the diverse fees per piece and availability within your region. Essentially the prep performance is the same for a wood tie wall. You want the very first course of block to sit below the completed grade as an anchor. A solid sub-base of stone, stone dust, or concrete is needed and needs to be tamped into place ahead of starting to steer clear of a settlement of your wall. This base will have to be as level as you possibly can as an out-of-level commence will show badly as the wall goes higher and may cause wall failure. Ensure the row is good and straight or the curve is a smooth gradual one.
ANCHORING YOUR WALL:
Pre-cast blocks call for a mesh netting referred to as “Geo-Grid” to become installed on the top of the initial course and normally every two or 3 courses thereafter. This netting comes in rolls and can reduce having a utility knife. Rule of thumb says the netting projects back into the hillside the same distance the wall is tall. 4-foot wall, 4-foot wide netting but quite a few walls need engineering and may require more netting. The netting is placed on top with the very first course inside 1″ in the front edge from the blocks below. The 2nd course of blocks is then set. Just after the 2nd course is complete and connector pins installed involving the blocks, the netting would be stretched back into the hillside leaving no wrinkles in the fabric. A layer of great soil/stone is then placed on leading on the netting and compacted into place up to the best on the 2nd course. The netting will hold the wall in location by the sheer weight with the soil you placed behind it. This process continues as much as the height of the wall.
