
In tropical climates, air conditioning (AC) units work tirelessly to keep indoor spaces cool and comfortable. To ensure that your AC unit operates at its best in such challenging conditions, regular cleaning and maintenance are essential. This do-it-yourself (DIY) guide provides step-by-step instructions for cleaning your AC unit to optimize its performance and efficiency in tropical climates.
Importance of Regular AC Unit Cleaning in Tropical Climates
Tropical climates bring high temperatures, humidity, and airborne debris, all of which can take a toll on your AC unit. Regular cleaning is crucial for maintaining optimal performance and preventing issues such as reduced cooling capacity, increased energy consumption, and potential breakdowns. By following this DIY guide, you can help your AC unit function efficiently and prolong its lifespan.
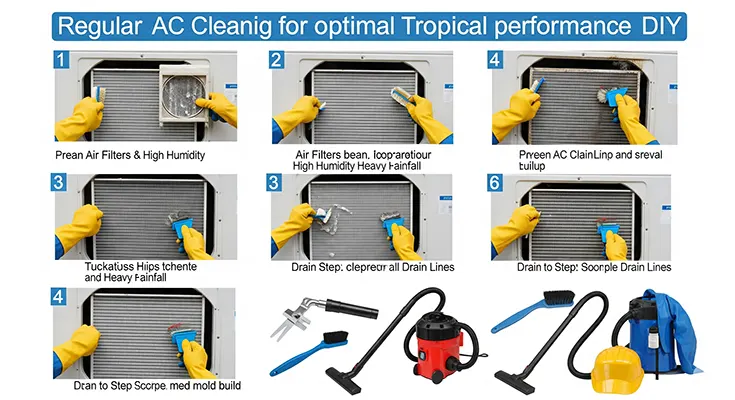
DIY Steps for Cleaning Your AC Unit
1. Safety First
Before starting any cleaning or maintenance tasks, ensure that the AC unit is powered off and unplugged to avoid any electrical hazards. Additionally, use personal protective equipment such as gloves and safety goggles to protect yourself from dirt, dust, and cleaning solutions.
2. Exterior Cleaning
- Remove Debris: Clear away any leaves, twigs, or other debris from around the exterior of the AC unit to maintain proper airflow.
- Clean the Exterior Surfaces: Use a gentle cleaning solution and a soft brush to wipe down the exterior surfaces of the AC unit, removing dirt, dust, and grime.
3. Air Filter Cleaning or Replacement
- Remove the Air Filter: Locate the air filter within the AC unit and carefully remove it.
- Clean or Replace the Air Filter: If the air filter is reusable, gently wash it with a mild detergent, rinse it thoroughly, and allow it to dry completely before reinserting it. If it’s a disposable filter, replace it with a new one.
4. Coil Cleaning
- Access the Coils: Depending on the type of AC unit, you may need to remove a panel to access the evaporator and condenser coils.
- Clean the Coils: Using a coil cleaning spray or a mixture of mild detergent and water, carefully clean the coils to remove accumulated dirt, dust, and debris. Use a soft brush to gently scrub the coils, and then rinse them thoroughly with water. Allow the coils to dry completely before reassembling the unit.
5. Condensate Drain Cleaning
- Clear the Drain Line: Locate the condensate drain line and check for any blockages. Use a mixture of warm water and vinegar or a specific drain cleaning solution to flush out any clogs and ensure proper drainage.
6. Straighten and Clean the Fins
- Inspect the Fins: Carefully examine the fins of the AC unit for any bent or damaged areas.
- Straighten and Clean the Fins: Use a fin comb to straighten any bent fins, and then gently clean them with a soft brush or a specialized fin cleaning tool to remove dirt and debris.
7. Reassemble and Test
Once you have completed the cleaning process, reassemble the AC unit, plug it back in, and power it on. Allow the unit to run for some time and observe its performance, ensuring that the airflow is consistent, and the cooling capacity is optimal.
Regular cleaning and maintenance are key to ensuring that your AC unit performs at its best in tropical climates. By following this DIY guide, you can enhance the efficiency, longevity, and reliability of your AC unit while also improving indoor air quality. Remember to adhere to the manufacturer’s recommendations and schedule professional maintenance as needed to keep your AC unit in top condition, providing cool comfort for years to come.
