
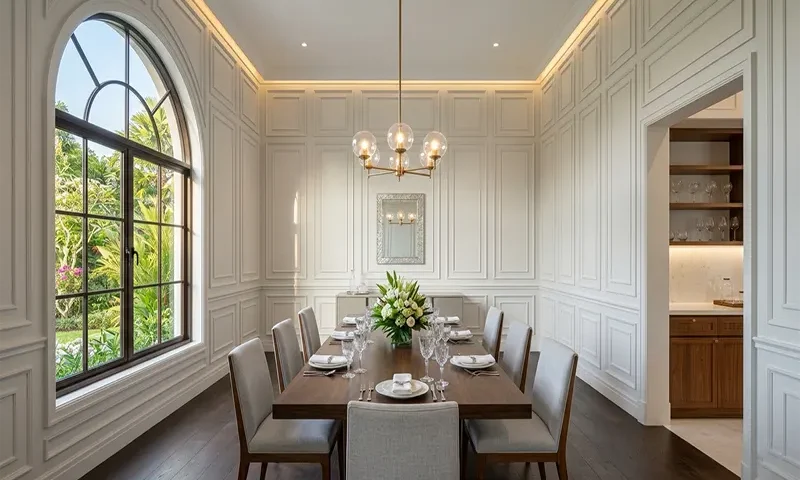
In the realm of high-end interior architecture, few elements possess the transformative power of floor-to-ceiling wall paneling. While traditional wainscoting—typically installed at chair-rail height—serves to protect walls and add a touch of classic charm, full-wall paneling creates an entirely different atmosphere. It introduces a sense of “enveloping luxury,” shifting the dining room from a simple functional space into a curated, gallery-like environment.
By utilizing vertical lines to draw the eye upward, floor-to-ceiling millwork effectively “lifts” the ceiling, making even standard-height rooms feel more expansive and structurally significant.
Shaker vs. Traditional Wainscoting: Choosing Your Language
The “language” of your millwork defines the soul of the room. In 2026, two primary styles dominate the luxury market:
The Shaker Aesthetic
Shaker-style paneling is defined by its recessed centers and clean, square edges. It is the hallmark of “Modern Farmhouse,” “Transitional,” and “Scandi-Minimalist” designs. Because of its lack of ornate molding, it feels contemporary and honest, relying on geometric shadows rather than intricate carvings for its visual interest.
Traditional Raised Panel
Contrastingly, traditional or “Picture Frame” wainscoting utilizes decorative moldings (bolection) that project outward from the wall. This is ideal for “Grandmillennial” or “Old World” aesthetics, where the goal is to evoke the gravitas of a historic European manor.
Proportion and the “Rule of Thirds”
The difference between a “DIY” look and a professional architectural installation lies in the ratios. If the rails (horizontal pieces) and stiles (vertical pieces) are too thin, the wall looks fragile; if they are too thick, the room feels claustrophobic.
- The Golden Ratio: For a standard 8-to-10-foot ceiling, the stiles should generally be between 3.5 and 5 inches wide.
- The Base and Crown Integration: To ensure the paneling looks “built-in,” the bottom rail should be beefier than the side stiles, often integrating directly with a substantial 5-to-7-inch baseboard. Similarly, the top rail should meet a crown molding that “caps” the entire assembly, locking the panels into the architecture of the house.
Proportions Cheat Sheet
| Ceiling Height | Recommended Stile Width | Recommended Header Height |
| 8 Feet | 3.5 Inches | 4 – 5 Inches |
| 10 Feet | 4.5 – 5 Inches | 6 – 8 Inches |
| 12 Feet+ | 6 Inches+ | 10 – 12 Inches |
Color Strategy: The “Color Drench” vs. High-Contrast
The color you choose for your full-wall paneling will dictate the room’s mood more than the furniture itself.
The “Color Drench” Trend
A massive trend for 2026 is monochromatic color drenching. This involves painting the paneling, baseboards, crown molding, and even the ceiling in the exact same tone and finish (typically a sophisticated eggshell or matte). Deep jewel tones like navy, forest green, or charcoal create a moody, intimate “jewelry box” effect perfect for evening dinner parties.
High-Contrast Classic
For those who prefer a brighter, more “Airy-Scandi” look, white Shaker panels paired with a dark “Greige” or a bold botanical wallpaper in the recessed centers remain a timeless choice. This allows the architectural lines to “pop” against the color of the wall behind them.
Technical Installation and Layout Mapping
Before the first piece of wood is cut, you must map the room with surgical precision.
- Material Selection: For a smooth, paint-grade finish, MDF (Medium Density Fiberboard) is often preferred over solid wood because it does not expand and contract with humidity, which prevents unsightly cracks in the paint seams. If you desire a stained-wood look, Poplar or White Oak are the industry standards for their grain clarity.
- The “Sliver” Problem: Never start on one side of a wall and work across. Instead, find the center of the wall and work outward. This ensures that your corner panels are equal in width and that you don’t end up with a 2-inch “sliver” of a panel next to a door frame.
Lighting and Furniture Synergy
Dining rooms are atmospheric by nature. Floor-to-ceiling paneling provides the perfect opportunity to upgrade your lighting layers.
- The Sconce Layer: Instead of relying solely on a chandelier, integrate hardwired wall sconces directly into the center of specific panels. This creates a “hotel luxury” feel and provides soft, eye-level illumination that is much more flattering for guests than overhead light.
- The Chandelier Scale: Because full-wall paneling adds so much visual “busyness,” you can afford to go larger with your light fixture. A grand, sculptural chandelier acts as the “anchor” for the geometric lines of the Shaker walls.
Styling Sidebar: Artwork on Paneled Walls
When hanging art on floor-to-ceiling panels, always center the piece within the recessed area of a single panel. Avoid hanging art that spans across the stiles (the vertical boards), as this breaks the architectural rhythm of the room.
Elegant floor-to-ceiling wainscoting is more than a decorative addition; it is a permanent architectural investment. It provides a “finished” feel that makes the room look furnished even when it is empty. Whether you opt for the clean, modernist lines of the Shaker style or the textured depth of traditional raised panels, this millwork serves as the ultimate foundation for a dining room designed for both comfort and grand conversation.
